
A weekend at home provided the perfect opportunity to get to a few crafts on our to-do list. Seeing as I'm so domestic, I'm sure this comes as no surprise. (Ha.) First up was a paint chip dry erase calendar.

I saw a picture of one a few months ago and loved the idea, so we bought two frames to make one for us and one as a Christmas gift. Naturally, we only had time to make one so we completed the gift for our friends and just kept using an ugly makeshift silver dry erase board as our calendar instead. This happy yellow calendar is definitely a welcome upgrade! Here's how we made ours:
Supplies: A 14x18 frame (we bought this one from Target for $16.99), 36 paint chips (12 each in 3 colors), white poster board, scissors or a paper cutter, and some sort of glue (we used little scrapbooking double-tape photo squares).
First, cut your poster board to be 14x18 inches. Then cut your 36 paint chips into 2x2 inch squares. With your scraps, cut another 7 rectangles that are 2 inches wide and a quarter inch tall (to be used for the days of the week). Then lay out your squares to figure out which 5x7-square pattern looks best. (You'll have one paint chip square left over.)
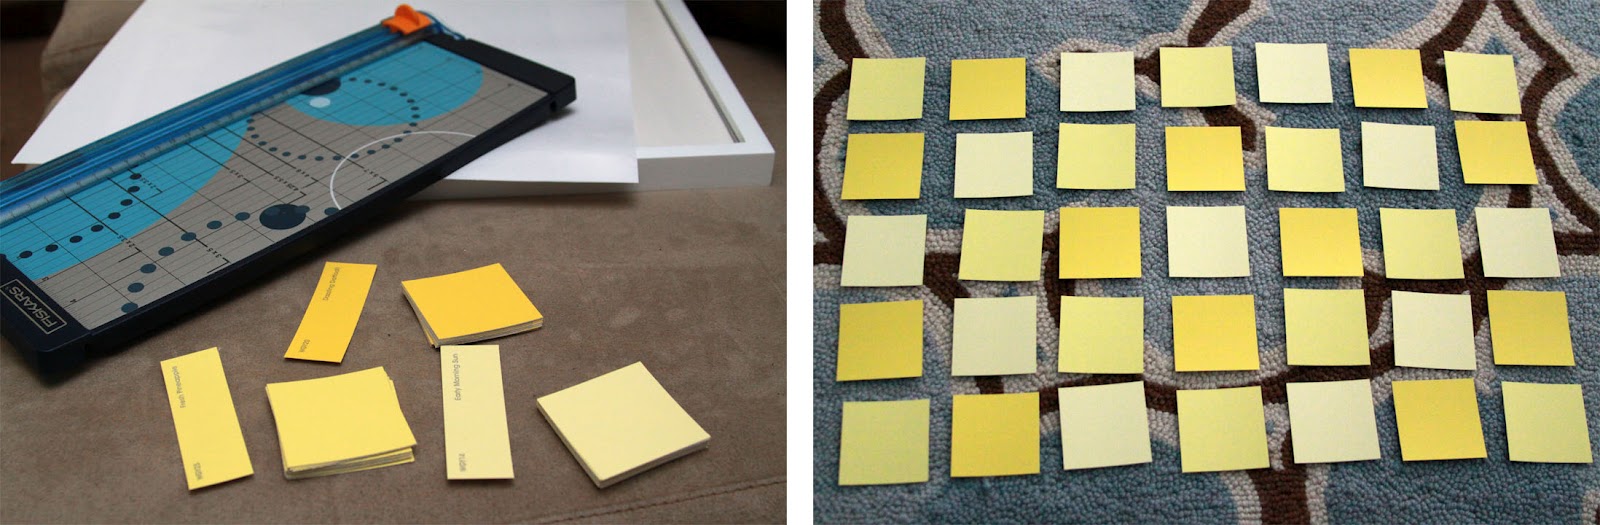
Next, starting with the bottom left square, start taping the chips into place on the poster board one at a time. We used 1.25 inch margins on both sides and the bottom, and had a quarter inch space between each square. To make our lives easier, we cut out a little quarter-inch L-shaped spacer that we placed in between each square so we didn't have to measure every time. (Let it be known, I use "we" loosely in this paragraph, since my perfectionist engineer of a husband did most of the dirty work.) Thirty-five squares and 7 little days-of-the-week rectangles later, and you're almost done!

Just place the poster board in the frame like a picture and write on the glass with a dry erase marker. Voila!

In other crafting news, Carolyn and I put our Fashion District fabric remnants to good use. We used this tutorial and made two necklaces each, as well as a couple hair clips for Emery. It was really simple, really fun, and really cheap. Since we bought the fabric remnants for $1 each and necklace chain for $3, we spent a mere $1.25 on each necklace. Not bad, eh?


Lastly, we remembered why we aren't usually crafty when we made these ribbon and pearl necklaces. Maybe it was the slippery ribbon, or maybe it was the fact that it was 1 a.m. when we decided to buckle down and make them, but my goodness, they were a pain in our rear ends. We were on this big crafty, domestic high after being inspired by so many pretty fabrics in LA, making the calendar, rocking the fabric necklaces, and trying new recipes throughout the week. Then we started making these ribbon necklaces and wanted to pull our hair out, and that's when we were like, "Oh, yeah! That's why we don't do this craft thing!"

That said, they sort of look pretty, so maybe crafting isn't so bad after all.


I love your calendar idea! How cute!
ReplyDeleteYou know Ash, I gotta say I never pictured you doing a craft blog. hum, shock of the day.
ReplyDeleteI love them. great job. the post it.. smart.. very.
I love that calendar idea! I'm definitely making that now!
ReplyDeleteMe neither, Shay! But it's such a rare occasion that it had to be documented haha. I'm not entirely un-domestic... right?
ReplyDeleteSuch cute ideas!
ReplyDeleteAsh, these are awesome crafting ideas! I especially am interested in the calendar!! I will have to get brave and try it! :) thanks for the ideas!
ReplyDeleteHey sweetie! You have a very beautiful blog with a lot of inspiring posts! I'd like to invite you to be my friend and follow each other:)
ReplyDeleteI also have an amazing GIVEAWAY on my blog, please check it out:)
I've already worn two of my necklaces! Oh, and I'm convinced on making the calendar! Probably next week! It definitely was fun doing crafts with you and can't wait until next time!
ReplyDeleteSuch a cute idea!! I am going to make one now!!
ReplyDeleteI am amazed and impressed! Love the calendar.
ReplyDeleteSuch cute ideas-- you're so crafty Ash! I am very impressed. You'll have to teach me how to make those cute flowers when you move home so I can make some for baby girl :)
ReplyDeleteCrafting is fun.. but in only in small doses. I love the pearl necklace.
ReplyDeletelove the necklaces! so cute!
ReplyDelete