hello!new213.1 hello!new213.4 hello!new213.5 hello!new213.6 hello!new213.9

Monday, April 16, 2012

Rolling

*I'm guest posting for Nicole over at Flip Flops and Combat Boots today! Be sure to check it out.*

One of my all-time favorite holiday traditions is rolling Easter eggs with the Grafs. It's a family tradition dating back many generations to our ancestors in Wales. I grew up thinking this was an entirely normal activity for everyone, but have since been informed that it is not. Although, a brief Google search just confirmed that its English roots are still going strong, and that the White House has hosted an annual Easter egg roll for 134 years and counting. (So, there.) That said, I'm pretty sure that our version of egg rolling is pretty unique no matter what tradition you stack it up against.
We start off by dyeing and decorating hard boiled eggs just like any regular person. And then the fun begins. We hike into a pre-selected location with a nice, dirt hill and then get to work on an intricate track for the eggs. This year, Matt, Christian and Matthew stepped up as the head engineers of the project and created quite the masterpiece! After the first curve, the egg crossed a bridge which it then funneled back underneath. It then wound up for the big jump over a water hazard, after which it shot underneath a tunnel and then up and back a boomerang. Once it came down the boomerang ramp, the egg turned and zigzagged through a mini-half pipe and into a bowl below. At that point, it was stacked into a dirt egg crate where it awaited transportation to the top of the hill to start the journey down the track all over again.
The location
Hanging out during construction. Jake got a kick out of stomping on tin foil.
The completed track!
Narrating the track on camera
The bridge-into-funnel
The jump
The boomerang ramp
The final zigzag, finish line, and waiting area
The little kids made their own straightaway track for the grand finale.
The egg rolling party lasts for a couple hours, and at the end, whoever's egg is the most intact is declared the winner. To top it off this time around, we then promptly destroyed that egg and the remainders of any other eggs with some good, old-fashioned batting practice.
And that, my friends, is how you roll Easter eggs.

Tuesday, April 10, 2012

Easter

I hope you all had a lovely Easter weekend! We were lucky enough to celebrate our Savior's resurrection with my grandparents and cousins in Southern Utah. Easter is such a beautiful holiday with such a beautiful meaning, and I love it for that. And I'd be lying if I didn't admit to loving the less religious aspects of it as well, like a classic egg hunt and the unparalleled Graf egg rolling extraordinaire. We'll get to the egg rolling later.

For now, here's a glimpse at Jakey's first Easter. He played in the grass for the first time, emptied his Easter basket, tried to eat plastic eggs, went to church with his great-grandparents, napped during Easter dinner, and looked mighty handsome during all of it.

Friday, April 6, 2012

That one time we were crafty

A weekend at home provided the perfect opportunity to get to a few crafts on our to-do list. Seeing as I'm so domestic, I'm sure this comes as no surprise. (Ha.) First up was a paint chip dry erase calendar.
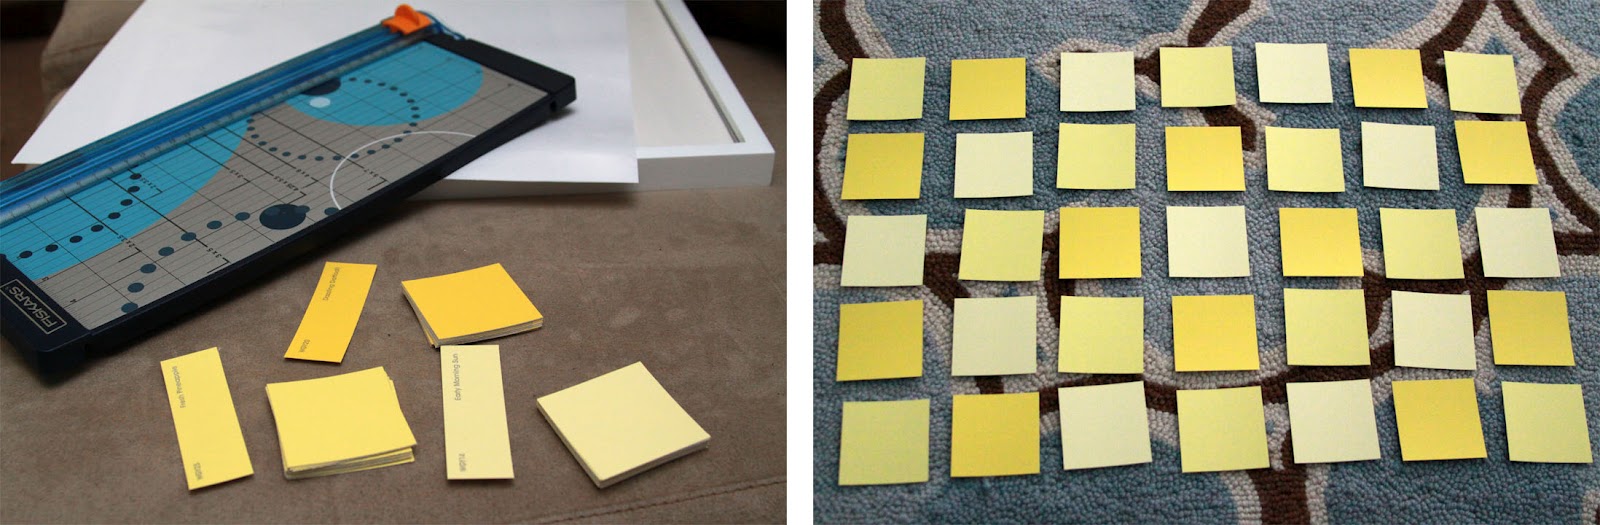
I saw a picture of one a few months ago and loved the idea, so we bought two frames to make one for us and one as a Christmas gift. Naturally, we only had time to make one so we completed the gift for our friends and just kept using an ugly makeshift silver dry erase board as our calendar instead. This happy yellow calendar is definitely a welcome upgrade! Here's how we made ours:

Supplies: A 14x18 frame (we bought this one from Target for $16.99), 36 paint chips (12 each in 3 colors), white poster board, scissors or a paper cutter, and some sort of glue (we used little scrapbooking double-tape photo squares).

First, cut your poster board to be 14x18 inches. Then cut your 36 paint chips into 2x2 inch squares. With your scraps, cut another 7 rectangles that are 2 inches wide and a quarter inch tall (to be used for the days of the week). Then lay out your squares to figure out which 5x7-square pattern looks best. (You'll have one paint chip square left over.)
Next, starting with the bottom left square, start taping the chips into place on the poster board one at a time. We used 1.25 inch margins on both sides and the bottom, and had a quarter inch space between each square. To make our lives easier, we cut out a little quarter-inch L-shaped spacer that we placed in between each square so we didn't have to measure every time. (Let it be known, I use "we" loosely in this paragraph, since my perfectionist engineer of a husband did most of the dirty work.) Thirty-five squares and 7 little days-of-the-week rectangles later, and you're almost done!
Just place the poster board in the frame like a picture and write on the glass with a dry erase marker. Voila!
In other crafting news, Carolyn and I put our Fashion District fabric remnants to good use. We used this tutorial and made two necklaces each, as well as a couple hair clips for Emery. It was really simple, really fun, and really cheap. Since we bought the fabric remnants for $1 each and necklace chain for $3, we spent a mere $1.25 on each necklace. Not bad, eh?
Lastly, we remembered why we aren't usually crafty when we made these ribbon and pearl necklaces. Maybe it was the slippery ribbon, or maybe it was the fact that it was 1 a.m. when we decided to buckle down and make them, but my goodness, they were a pain in our rear ends. We were on this big crafty, domestic high after being inspired by so many pretty fabrics in LA, making the calendar, rocking the fabric necklaces, and trying new recipes throughout the week. Then we started making these ribbon necklaces and wanted to pull our hair out, and that's when we were like, "Oh, yeah! That's why we don't do this craft thing!" 
That said, they sort of look pretty, so maybe crafting isn't so bad after all.

Wednesday, April 4, 2012

PCS Party

It's an interesting thing having virtually no control over where we'll live for the next, oh, 17 years of our lives. All we can do is submit Matt's dream sheet, cross our fingers, and hope that the mythical-sounding functionals will use a click of their mouse to send us somewhere wonderful. That time between putting in our requests and receiving Matt's orders is killer, and we are fully aware that the answer we await could be either incredibly exhilarating or incredibly disappointing.

During that waiting period this time around, I came up with the idea to start a tradition of PCS parties. PCS stands for "permanent change of station," and is basically military-speak for "move." I pictured getting Matt's orders, then throwing a party to celebrate the news and start getting excited for our new adventure, wherever it may be. These PCS parties would include a dinner menu from the new location, a delicious dessert, and a little activity in which we'd list all the great things about the new location as well as all the fun things we want to do while we live there. In my mind, I imagined PCS parties being particularly important down the road, with an older Jake and his younger siblings. Having moved around a lot while growing up, I know that moves are both awful and awesome for kids, and I think kicking off the news with a party will soften the blow a bit and help our future family focus more on the awesome.

Then, we got orders to Hill AFB. Wonderful, for sure, but also terribly anticlimactic. (For those of you who are LDS, it felt a little like opening a mission call to Boise, Idaho. Really amazing, but when you could go anywhere in the world...) A PCS party felt a little less necessary since we already know basically all there is to know about the area, so I put it off for a bit. But then I realized that perhaps a party is even more in order to get us really excited about this move. Plus, if I'm going to start a tradition, I might as well start it now. So last weekend, we threw our first little PCS party!
For dinner, Carolyn helped me whip up Cafe Rio sweet pork salads -- one of Matt and my favorite Utah restaurant meals -- and we broke out the sparkling cider. Then we had a yummy cheesecake (hooray for Utah's new Cheesecake Factories!) for dessert and got started on our list. In the end, we had a poster board full of dozens and dozens of the best things Utah has to offer.
We were happy about our impending move before, but I can honestly say that we are excited now! (Even though, I must admit, its close proximity to California is one of the items on the "great things" list haha.) I therefore consider our first PCS party a complete success.

Monday, April 2, 2012

LA Fashion District

Last week, girls outnumbered the boys in the Davis house. Carolyn and Emery came to play for seven whole days, and we made sure to do as many girly things as possible. Our biggest outing was good, old-fashioned street shopping in downtown Los Angeles.

The LA Fashion District is a whopping 100 blocks full of fabric, flowers, clothing, shoes, accessories, and all sorts of random paraphernalia. It also includes Santee Alley, which is like NYC's Canal Street shopping on steroids. Turns out, it was rather ambitious of us to tote two babies along for hours and hours of walking and window shopping, but luckily our little ones were champions. Plus, the added inconvenience of having just one free hand and having a grabby baby in the other probably saved us a lot of money! In the end, we just picked up some fabric remnants, a shirt for Carolyn, and a suit for Jakey (so cute, and so cheap!). Pretty sure Matt was proud of my restraint.
Related Posts Plugin for WordPress, Blogger...